Introduction to Assistants in LangGraph
When building AI agents, it's common to iterate rapidly changing prompts, switching LLM providers, fine-tuning system messages, or adding/removing tools. These changes often affect the behavior of the agent but not necessarily the underlying architecture of the graph.
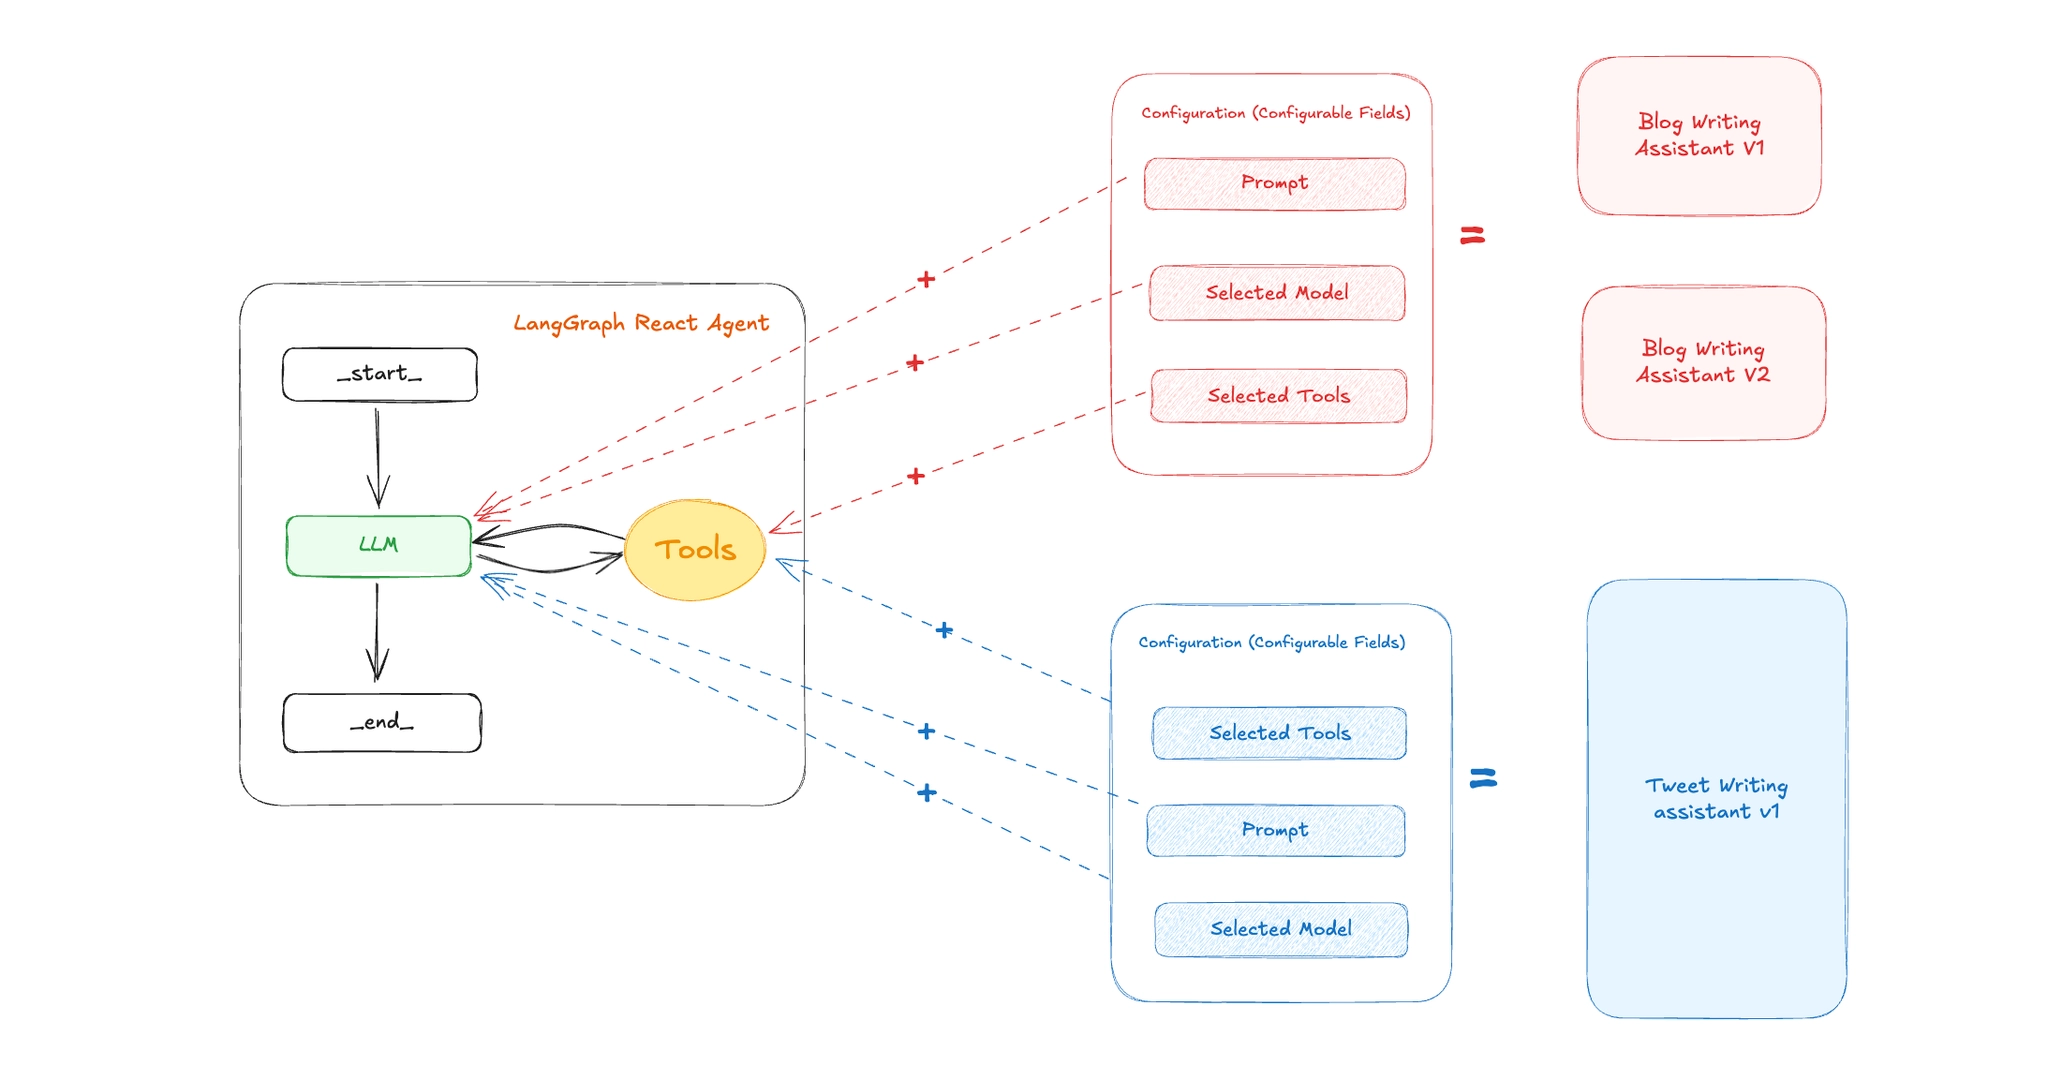
LangGraph introduces a powerful abstraction called Assistants that allows developers to define multiple "personalities" or versions of an agent all powered by the same graph structure, but with different configurations.
Why Assistants Matter
LangGraph Assistants provide a clean separation between graph logic and agent behavior. This unlocks several powerful capabilities:
-
Experimentation & A/B Testing
Developers can spin up multiple assistants with different prompts, toolsets, or models to compare performance and iterate quickly.
-
No-Code or Low-Code Customization
Product teams or end-users can tweak assistant behavior (e.g., tone, tools, goals) without touching any of the underlying Python code. This makes assistants especially useful for building configurable SaaS products.
-
Multi-Tenant Agent Platforms
You can build platforms where each tenant or user gets their own custom assistant instance all powered by the same graph logic but personalized to their use case.
-
Composable, Reusable Graphs
Instead of duplicating graph code for every new version of your agent, you define a single reusable graph and plug in different assistant configurations.
Step-by-Step: Implementing Assistants in LangGraph
1. Define the Agent Configuration Schema
Use Pydantic to define a config schema that supports dynamic customization (prompt, model, tools):
from pydantic import BaseModel, Field
from typing import Annotated, Literal

class Configuration(BaseModel):
    """The configuration for the assistant"""

    system_prompt: str = Field(
        default="You are a helpful assistant",
        description="The system prompt to guide agent behavior."
    )

    model: Annotated[
        Literal["openai:gpt-4o-mini", "openai:gpt-4o"], {"__template_metadata__": {"kind": "llm"}}
    ] = Field(
        default="openai:gpt-4o-mini",
        description="The LLM to use (in provider:model format)."
    )

    selected_tools: list[Literal["web_search", "get_weather"]] = Field(
        default=["web_search"],
        description="Tools to include in the assistant."
    )
2. Define Your Tools
Each tool should be annotated with @tool so that LangGraph recognizes them. Here's a sample:
from langchain_core.tools import tool

@tool
def web_search(query: str):
    """Performs a web search and returns a string result."""
    response = tavily.invoke({"query": query})
    return response

@tool
def get_weather(city: str):
    """Returns mock weather data for a city."""
    return f"The weather in {city} is sunny."
3. Build the ReAct Agent Graph
Define the following utility functions:
def get_tools(selected_tools: list[str]):
    "convert a list of tool name to actual tool functions"

    tools = []

    for tool_name in selected_tools:
        if tool_name == "web_search":
            tools.append(web_search)

        if tool_name == "get_weather":
            tools.append(get_weather)


return toolsfrom langchain.chat_models import init_chat_model
def load_chat_model(fully_specified_name: str):
"""Load a chat model from a fully specified name
Args:
fully_specified_name (str): _description_
"""
provider, model = fully_specified_name.split(":", maxsplit=1)
return init_chat_model(model=model, model_provider=provider)
This function dynamically builds the LangGraph agent using the configuration:
from langgraph.prebuilt import create_react_agent
from src.configuration import Configuration
from src.tools import get_tools
from src.utils import load_chat_model
from langchain_core.runnables import RunnableConfig

def make_graph(config: RunnableConfig):
    configurable = config.get("configurable", {})

    llm = configurable.get("model", "openai:gpt-4o-mini")
    selected_tools = configurable.get("selected_tools", ["web_search"])
    prompt = configurable.get("system_prompt")

    graph = create_react_agent(
        model=load_chat_model(llm),
        tools=get_tools(selected_tools),
        prompt=prompt,
        config_schema=Configuration
    )

    return graph
✅ get_tools() should return a list of Tool objects based on names like "web_search" or "get_weather".
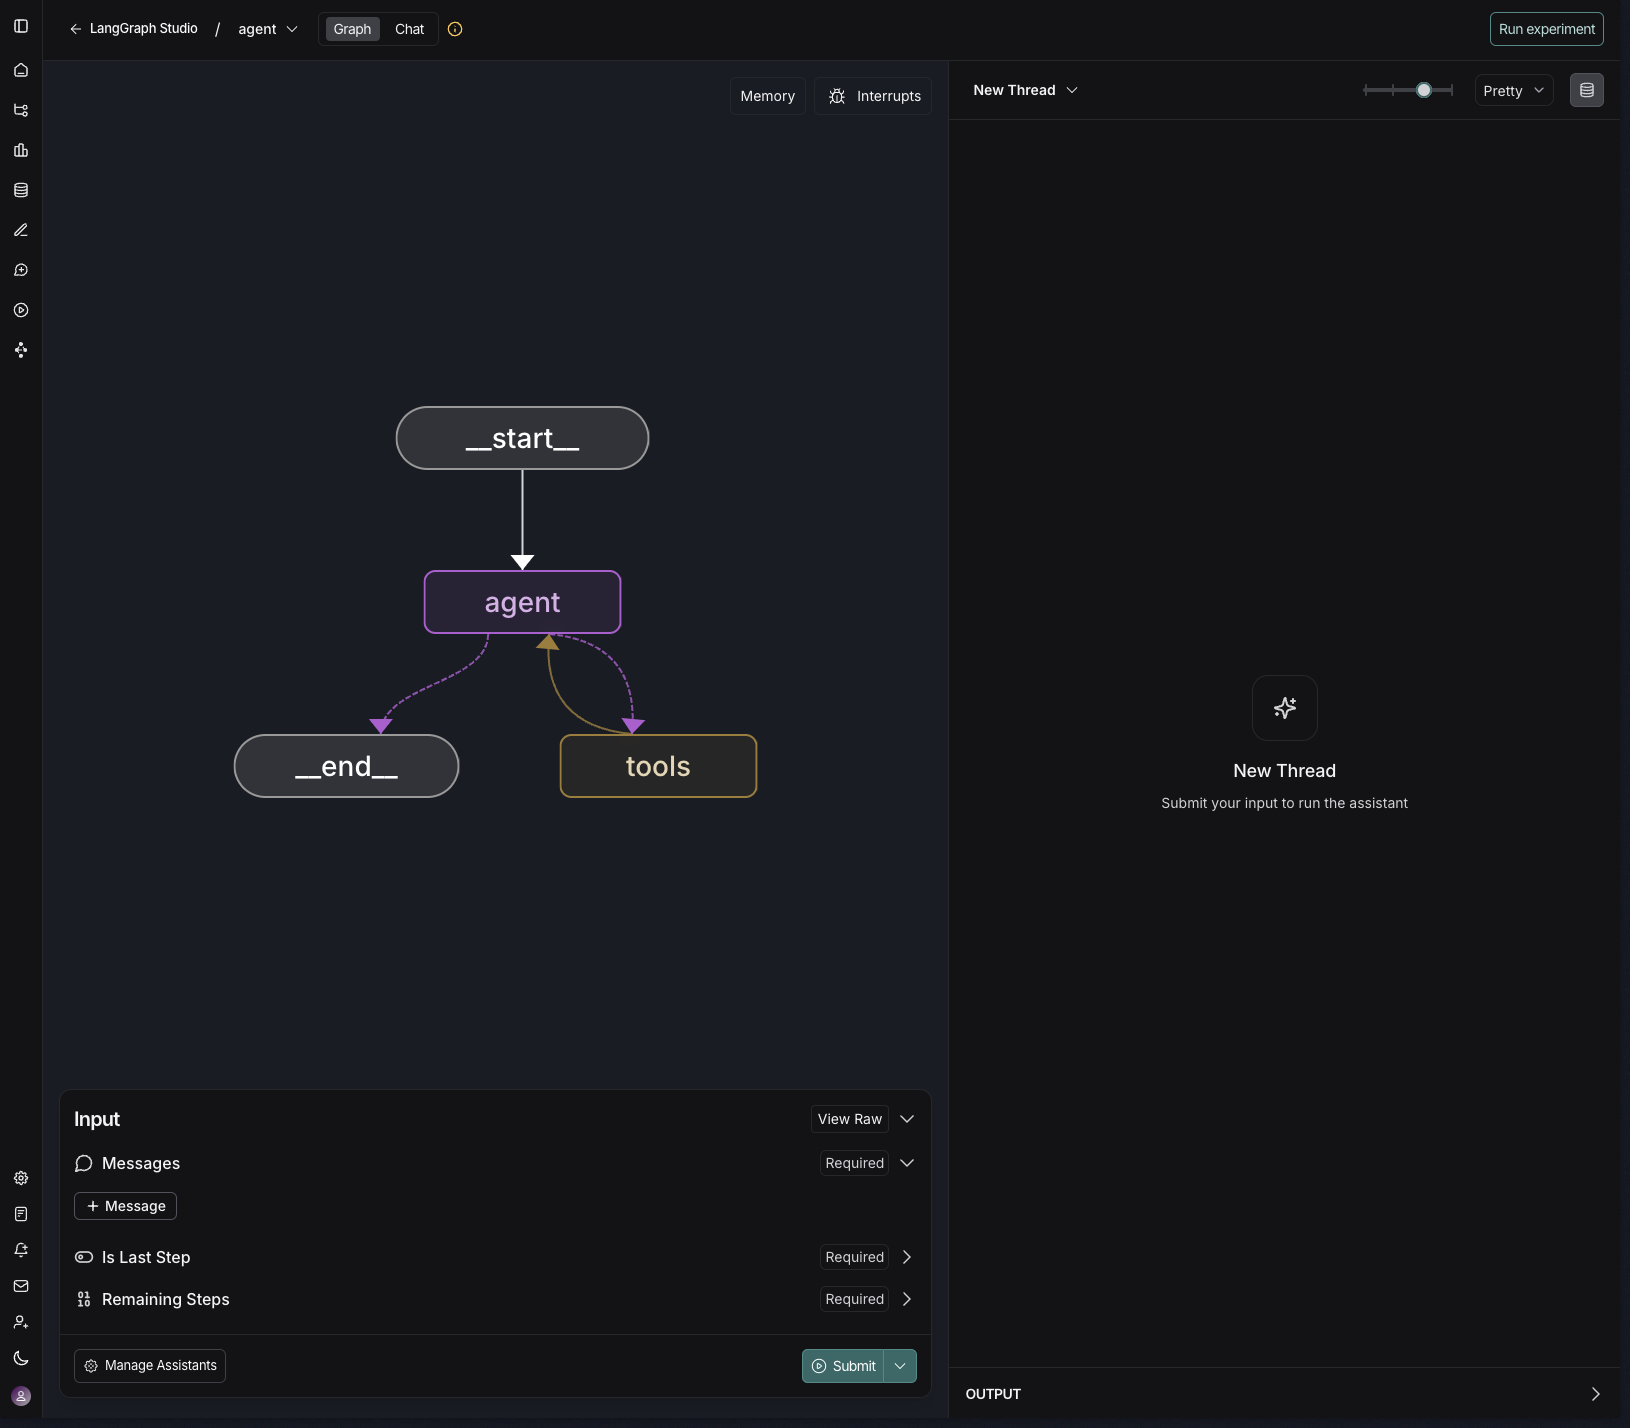
4. Run the Graph in LangGraph Studio
After you define your graph using make_graph(), you can interact with it visually in LangGraph Studio, a powerful interface for building and testing agents.
Add langgraph.json
First, create a file named langgraph.json in your project root:
{
    "graphs": {
        "agent": "src/graph.py:make_graph"
    },
    "dependencies": ["."],
    "env": "./.env",
    "python": "3.11"
}
Replace src/graph.py with the actual path to your make_graph function if it's different.
▶️ Run the Development Server
Start LangGraph Studio locally by running:
langgraph devThis will open your graph in your browser with a visual representation of your graph.
Create and Manage Assistants
Click "Manage Assistants" in the bottom left panel to open the Assistant Configuration window.
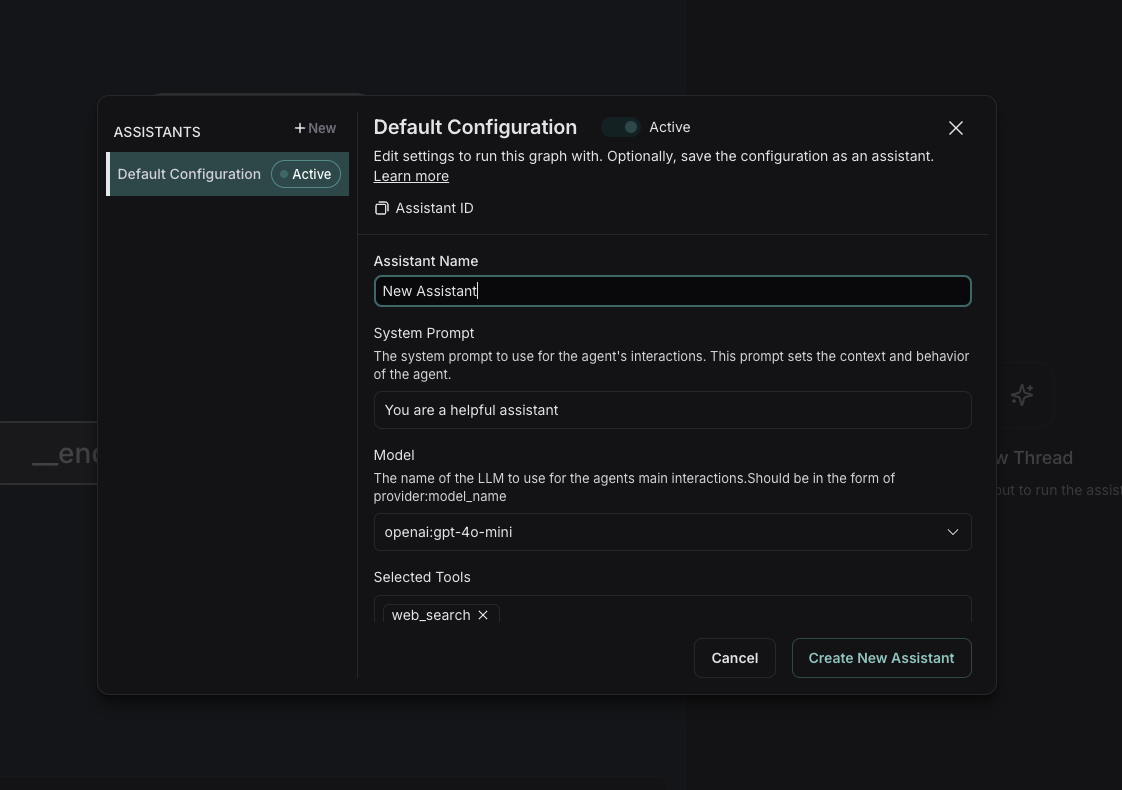
In the assistant configuration panel, you can:
- Name your assistant
- Edit the System Prompt
- Choose the LLM (e.g.,
openai:gpt-4o-mini) - Select the Tools to include (e.g.,
web_search,get_weather)
Click "Create New Assistant" to save the configuration. You can create multiple assistants with different behaviors all from the same graph!
Run a Thread
Once your assistant is active. You'll see how the assistant reasons, invokes tools, and produces results in real-time.
Wrap-up
LangGraph Assistants make it incredibly easy to:
- Build dynamic, multi-personality agents
- Maintain a clean separation between logic and behavior
- Empower teams to experiment without code changes
With visual tools like LangGraph Studio and assistant configuration panels, you're no longer limited to CLI or backend configs — you now have the full power of modular, reusable AI assistants at your fingertips.